
Introduction
Input validation in VMware Aria Automation and VMware Aria Orchestrator often starts simple.
A virtual disk must be between 10 and 2000 GB.
A CPU value must be one of a few allowed options.
A list of TCP ports must stay within an approved range.
At first, this is easy to solve with imperative validation code. But as the number of inputs grows, validation logic quickly becomes repetitive, harder to read, and harder to reuse across custom form actions and workflows.
This is the problem I wanted to solve with a small policy-based validation framework for Aria Orchestrator.
The idea is simple:
Instead of writing validation logic again and again, define validation rules declaratively in a policy and let a reusable validator do the work.
The code and the full policy reference are available on GitHub:
GitHub: https://github.com/viscop/aria-dto-validator
This article does not try to document every option of the validator. The goal is to explain the problem, show the basic usage pattern, and demonstrate why the same validation should run both in the form action and inside the workflow.
The Problem with Imperative Validation
A typical validation action may start with something simple like this:
var message = "";

if (diskSize >= 10 && diskSize <= 2000) {
  return message;
}

message = "Disk size is not between 10 and 2000";
return message;For a single field, this is still easy to understand.
But real-world forms usually contain more than one input. You may need to validate strings, numbers, arrays, port ranges, required fields, allowed values, naming conventions, and dependencies between fields.
Over time, this often leads to duplicated code, slightly different validation logic in different places, and a higher cognitive load for everyone who has to maintain the workflow.
A Declarative Approach
Instead of spreading validation logic across multiple actions and workflows, the validation rules can be described in a policy.
A policy is easier to read, easier to reuse, and easier to extend.
Here is a small example:
var policy = [
  {
    path: "hostname",
    type: "string",
    minLength: 3,
    maxLength: 30,
    regex: "^[a-z0-9-]+$",
    onMissing: "fail",
    errorMessage: "Hostname is invalid."
  },
  {
    path: "cpu",
    type: "number",
    integerOnly: true,
    allowedValues: [2, 4, 8],
    onMissing: "fail",
    errorMessage: "CPU must be 2, 4, or 8."
  },
  {
    path: "ports[*]",
    type: "number",
    allowedValues: ["80", "443", "8443-8445"],
    onMissing: "fail",
    errorMessage: "One or more ports are not allowed."
  }
];This policy validates three inputs:
- hostname
- cpu
- ports
The validation logic itself is handled by the framework:
var result = System.getModule("ch.org.security.validation").validateDto(
    policy,
    inputDto,
    null
);

return result;A successful validation result looks like this:
{
  valid: true,
  errors: [],
  warnings: []
}If validation fails, valid is set to false and the errors array contains the validation messages.
Validating Arrays
One useful feature is array validation.
If a property contains an array, the path can use [*]:
path: "ports[*]"This means that each item in the array is validated against the rule.
For example, this DTO is valid:
{
  hostname: "test123",
  cpu: 4,
  ports: ["80", "443"]
}This DTO is not valid:
{
  hostname: "TEST_123",
  cpu: 6,
  ports: ["80", "1234"]
}Possible validation errors could be:
Hostname is invalid.
CPU must be 2, 4, or 8.
One or more ports are not allowed.Type Handling and Port Ranges
In many form scenarios, values arrive as strings even if they represent numbers.
For example, TCP ports may come from the form as a string array:
{
  ports: ["80", "443"]
}The policy can still explicitly validate the values as numbers:
{
  path: "ports[*]",
  type: "number",
  allowedValues: ["80", "443", "8443-8445"],
  onMissing: "fail",
  errorMessage: "One or more ports are not allowed."
}The allowed values can also contain ranges: 8443-8445
This means that the following values are allowed: 8443, 8444 and 8445
This removes the need for repetitive nested loop logic and keeps the validation policy compact and readable.
Dynamic Policy Values
The policy does not have to be limited to static values.
Because policies are plain JavaScript objects, selected values can be built dynamically before the validator is called. This makes the framework much more flexible, because validation rules can depend on runtime context.
For example:
var allowedEnvironments = ["dev", "test", "prod"];

function getAllowedMemorySizes(environment) {
    if (environment === "prod") {
        return [8, 16, 32, 64];
    }

    if (environment === "test") {
        return [4, 8, 16];
    }

    return [2, 4, 8];
}

var environment = userDTO.environment;

var policy = [
  {
    path: "environment",
    type: "string",
    allowedValues: allowedEnvironments,
    onMissing: "fail",
    errorMessage: "Environment is not allowed."
  },
  {
    path: "memoryGb",
    type: "number",
    integerOnly: true,
    allowedValues: getAllowedMemorySizes(environment),
    onMissing: "fail",
    errorMessage: "Memory size is not allowed for this environment."
  }
];This allows policies to use values from different sources, for example:
- Project context
- User context
- Configuration data
- A database
- A REST API
- A CMDB
- A custom registry
- Another Aria Orchestrator action
Integration in Aria Orchestrator
For the example setup, I use a few Aria Orchestrator actions.
The exact module structure can be adapted to your own environment.
| Action | Purpose |
|---|---|
| buildInputDto | Builds a DTO from multiple custom form fields. Mainly used by the custom form action. |
| evaluateExamplePolicy | Contains or returns the business-specific validation policy. |
| validateInput | Wrapper action used by both form validation and workflow validation. |
| validateDto | Core framework action that validates a DTO against a policy. |
Only validateDto is the generic framework part.
The other actions are integration examples and can be adapted to match your own naming conventions, module structure, or workflow design.
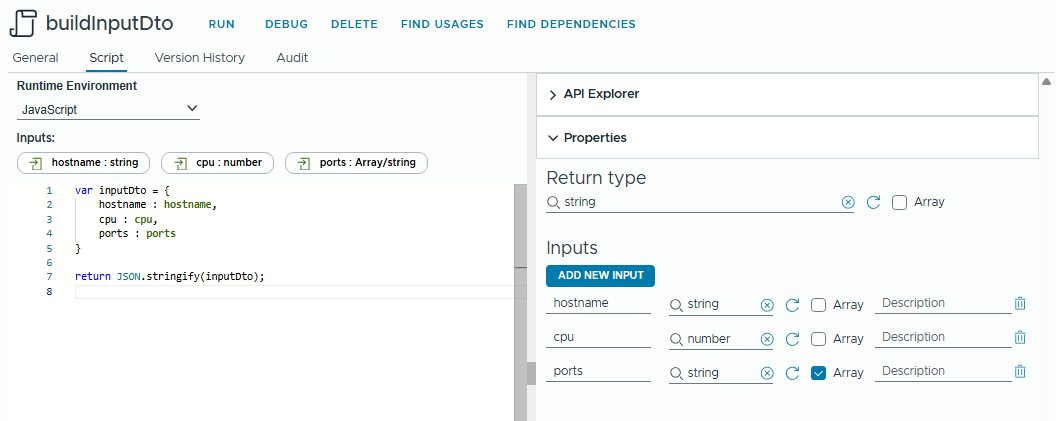
var inputDto = {
    hostname : hostname,
    cpu : cpu,
    ports : ports
}

return JSON.stringify(inputDto);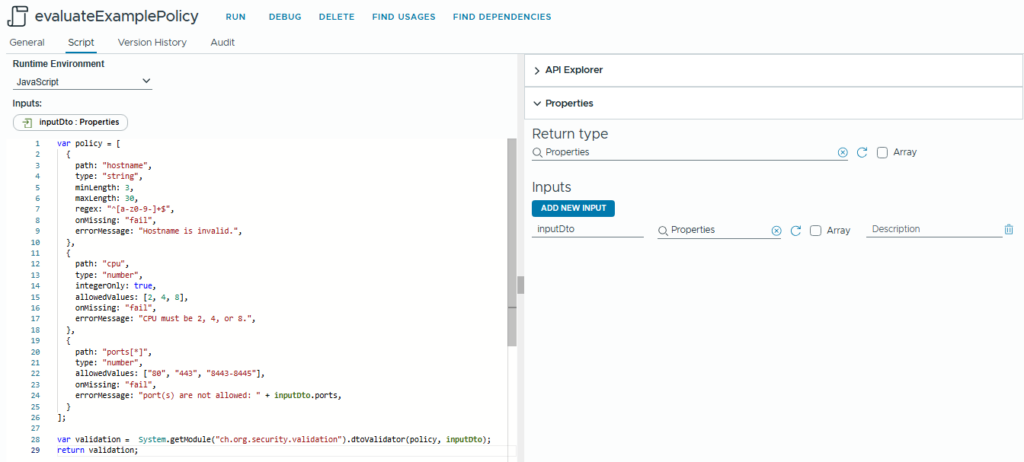
var policy = [
  {
    path: "hostname",
    type: "string",
    minLength: 3,
    maxLength: 30,
    regex: "^[a-z0-9-]+$",
    onMissing: "fail",
    errorMessage: "Hostname is invalid.",
  },
  {
    path: "cpu",
    type: "number",
    integerOnly: true,
    allowedValues: [2, 4, 8],
    onMissing: "fail",
    errorMessage: "CPU must be 2, 4, or 8.",
  },
  {
    path: "ports[*]",
    type: "number",
    allowedValues: ["80", "443", "8443-8445"],
    onMissing: "fail",
    errorMessage: "port(s) are not allowed: " + inputDto.ports,
  }
];

var validation =  System.getModule("ch.org.security.validation").dtoValidator(policy, inputDto);
return validation;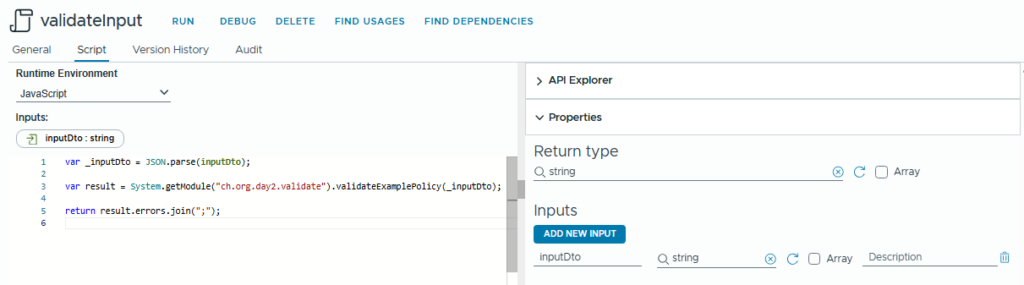
var _inputDto = JSON.parse(inputDto);

var result = System.getModule("ch.org.day2.validate").validateExamplePolicy(_inputDto);

return result.errors.join(";");This works as long as the validation action always returns a result object with an errors array. A slightly more defensive version checks the valid flag before returning the validation errors:
var _inputDto = JSON.parse(inputDto);

var result = System.getModule("ch.org.day2.validate").validateExamplePolicy(_inputDto);

if(!result.valid) {
  return result.errors.join(";");
}

return "";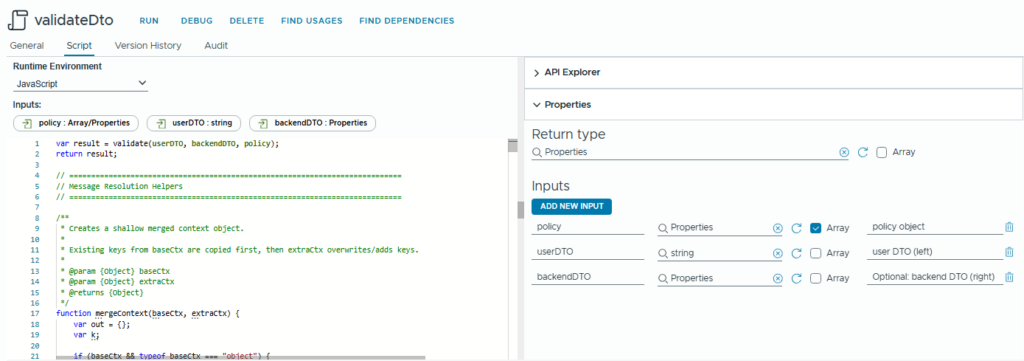
Copy the whole content from validateDto.js from GitHub
https://github.com/viscop/aria-dto-validator
Workflow
After the action structure has been defined, the next step is the implementation of a simple workflow.
The workflow uses the previously created validateInput action and demonstrates how they can be combined into a reusable automation process in Aria Orchestrator.
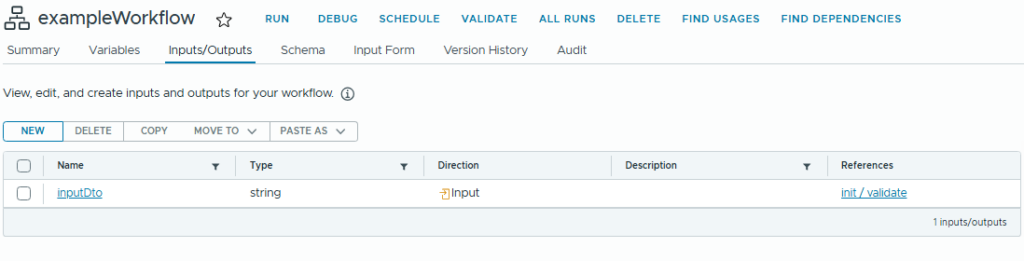
Whenever possible, I prefer to use a single workflow input that contains a JSON payload.This payload acts as a DTO, a Data Transfer Object.Instead of passing many separate workflow inputs, the workflow receives one structured object:
{
  "hostname": "test123",
  "cpu": 4,
  "ports": ["80", "443"]
}This makes handling the input much easier.
The downside is that the JSON properties must be documented properly, so that other engineers understand which fields are expected. But in practice, this documentation is required anyway.
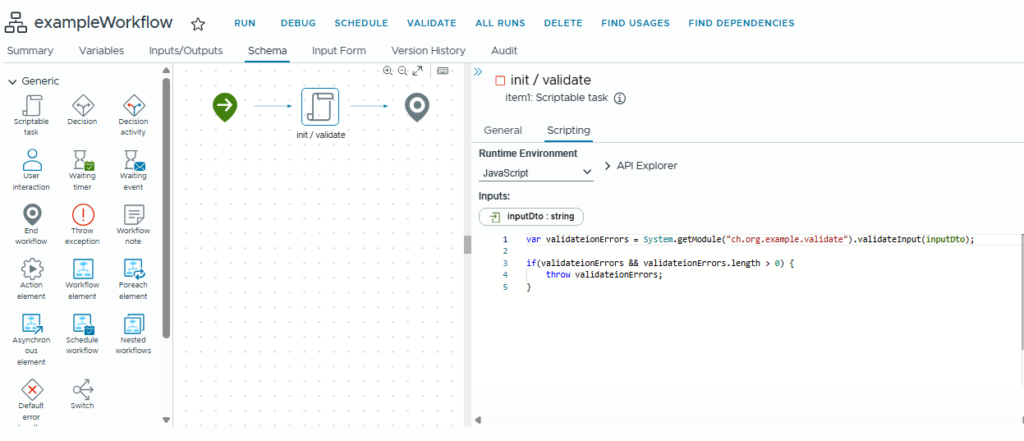
var validationErrors = System.getModule("ch.org.day2.validate").validateInput(inputDto);

if (validationErrors && validationErrors.length > 0) {
    throw validationErrors;
}Why should validation also be performed inside the workflow?
The configured input validation is automatically executed for catalog items, Day 2 actions, and resource actions. This ensures that submitted form data is validated before the workflow is invoked through the regular request process.
However, this validation is tied to the request layer. If the workflow is executed directly, for example through the REST API, the configured input validation is not executed. For this reason, business-critical validation should also be implemented inside the workflow.
Workflow-level validation adds an additional layer of protection and ensures that critical processes are validated independently of how the workflow was started.
Custom Form
In this example, the form contains three visible input fields and one DTO field that is passed to the workflow.
| Field | Display Type | Purpose |
|---|---|---|
| hostname | Text Field | String representation of the host name |
| cpu | Integer | Number of CPUs |
| ports | Array Input, String | List of TCP ports |
| inputDto | Text or hidden field | JSON representation of the DTO passed to the workflow |
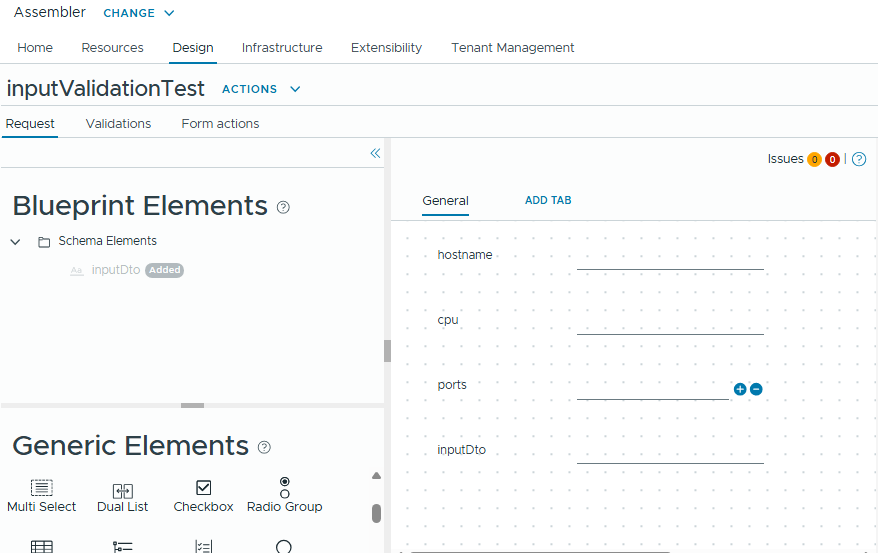
The inputDto workflow input requires a JSON string, which is generated by the buildInputDto action.
The custom form action builds the DTO from the visible form fields.
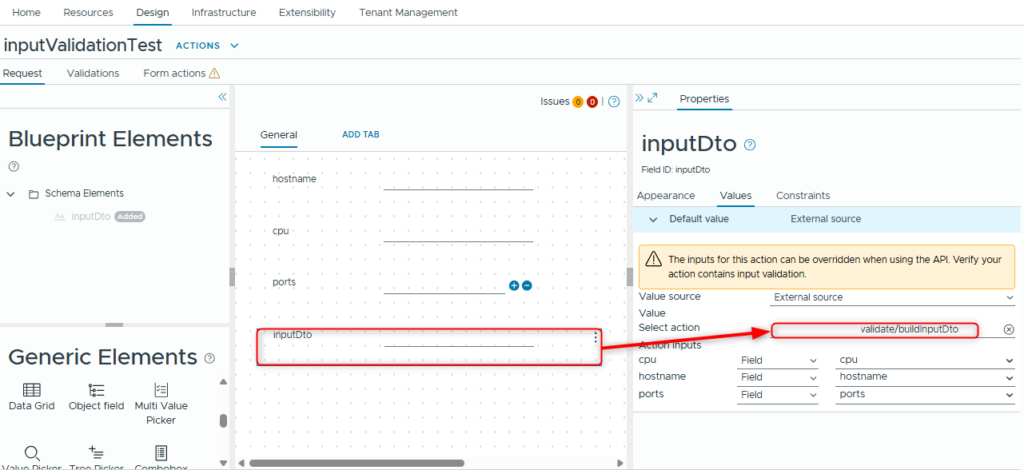
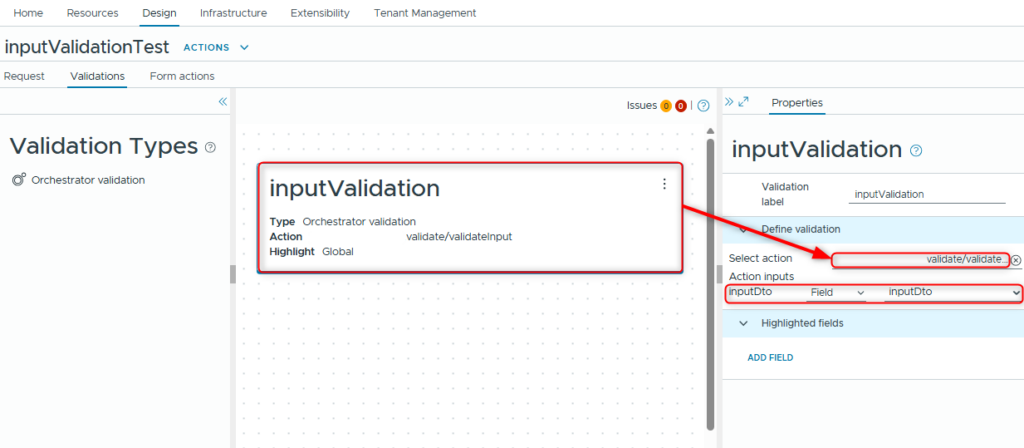
To enable UI validation, a validation rule must be configured.
The rule uses the previously created validateInput action.
The validateInput action was intentionally designed to return validation errors as a single string. An empty string means that the validation passed successfully. A non-empty string indicates that the validation failed, and the returned value contains the error message(s) displayed to the user.
All components are now integrated and ready to use. Feel free to experiment with the implementation and adapt it to your own workflows.
AI Disclosure
The concept, architecture, and functional design of the input validation approach described in this article were conceived by the author. The implementation and project-specific automated tests were generated using AI based on these requirements and design decisions.
AI was also used to assist with writing and editing this article. The final content was reviewed by the author.
Leave a Reply